|
|
| Frequently Asked Questions |
|
|
| Q: "What are your shipping policies?" |
| A: We try to ship every order we receive ASAP. Orders received after 9am (CDT), shipping using USPS, will on the next business day. Orders received after 2pm (CDT), shipping using UPS, will on the next business day. For the most part, FTBR manufactured items are in stock and ready to ship. In some cases, parts need to be ordered from Ford or assembled, so it could take as long as 3 or more days to ship depending on the kit ordered. This is because we are at the mercy of Ford for the availability and delivery of their parts. If next day air is selected as your shipping option, we will be in touch with you to verify the shipping date. Please let us know if you have any questions. BACK TO THE TOP |
| Q: What are your return and cancellation policies? |
| A: Returns are accepted on unopened packaged parts for 90 days
from the time of purchase for a 15% restocking charge. Customer is responsible for return freight. Cancellation Policy. All orders are automatically processed on our secure merchant processor and sent for shipment as soon as they are placed. During this process we incur irreversible fees. Therefore, while we understand that orders might need to be changed sometimes, we are unable to do it free of charge because of the irreversible fees we incur immediately after your order is placed. We strictly adhere to the following cancellation policy: If you cancel your order BEFORE it has been shipped, you will be assessed a 5% cancellation fee before credit is issued. If you cancel your order AFTER it has been shipped, please follow our Return Policies and Procedures. The cancellation will have to be treated as a Return with all applicable fees. Orders which are REFUSED AT DELIVERY will be assessed all of the applicable fees listed above - including restocking, cancellation and other applicable fees. |
| BACK TO THE TOP |
| General FAQ's |
| Q: "I can't seem to find a phone number on your site? How can I get some answers to questions I have?" |
| A: We do not have a phone number to call because we really do not have anyone available to answer phones all day and night. We have the FAQ on our site that honestly answers most of the questions that have been asked. That is how the FAQ was originally compiled and it gets added onto at regular intervals. We do offer e-mail support with a timely response time almost 24/7-365. But having said that we are not opposed to talking to our customers when they feel it is necessary. Send an inquiry to us with your phone number and a good time to call and we will call you. |
| BACK TO THE TOP |
| |
| Q: "Why does my car wheel hop?" |
| A: There are a few reasons your car wheel hops.
The biggest offender is all of the rubber in the differential mounts, control arm bushings and the subframe mounts. Secondary reasons would be sidewall stiffness of a hard street tire and the age of a tire. Old tires get harder with age and will hop horribly on any vehicle. Tires oscillate between traction and slip when they hop. In addition, the rubber or aftermarket poly in the suspension compresses, then rebounds and repeats. If you remove the "give" (suspension rubber) it can no longer do that. Some tires can increase and or decrease hop to a certain extent. For the smooth application of power, you need a rigid structure (stiffer IRS assembly) and tires that will absorb some of the 'shock' of a launch. For instance an Eagle F1 will wheel hop on almost any car. Chassis flex is also a contributor to wheel hop. See subframe connector info below. |
| BACK TO THE TOP |
| |
| Q: "Why does the ass end of my car feel so squirrelly when I mash on the fun pedal?" |
| A: Mainly from all of the rubber in the entire IRS assembly. Your wheels are mounted to the rear knuckles and the knuckles are mounted to the subframe via control arms with rubber bushings in four places. (two places on the upper control arm and two places on the lower control arm) When you mash the gas, this pushes the lower control arms forward, compressing the rubber bushings which in turn, increases rear toe-in. How much the control arm moves is directly dependent on your rear tires, how much RWHP you are putting down and how much traction you are able to get. The upper control arms are along for the ride. Keep in mind the whole subframe assembly is also mounted to the chassis in rubber and who knows what direction the tires are actually traveling at this point. This uncontrollable wandering of the rear tires translates into a vehicle that is hard to control in a particular direction. By removing the all of the rubber, your rear tires will gain control of their direction and you will feel the ass end plant and increase traction in a much more controlled manner. |
| BACK TO THE TOP |
| Q: "When I get on the gas hard, the rear end of my car wants to dart to one side
and when I let off the gas, it goes back the other way. What's causing this?" |
| A: This is somewhat of a common Cobra IRS problem. The first thing I would check would be the 36mm halfshaft retaining nut that holds the rear hub to the halfshaft. It needs to be torqued to 240-250#. If it was loose, you most likely destroyed your knuckle bearing. If it was run long enough in that loose condition, you may have also destroyed your rear hub as well. If you find the nut keeps loosening up, you're going to want to replace the nut. Even if you found the nut was tight, you're going to want to jack up the rear end of the car and feel the rear wheel for looseness in all directions. If the nut is tight and you have play in the hub/bearing, the bearing and/or the hub needs to be replaced. The torque on the 36mm nut should be checked every time you change your oil or before you head to the track. Sometimes people find a loose attaching bolt on the toe link but that's not real common unless that's been worked on recently. |
| BACK TO THE TOP |
| Q: "Do I need subframe connectors?" |
| A: Yes absolutely, any SN-95 chassis needs a good Full Length Sub Frame Connector. There are many subframe connectors available on the market today but we recommend the Stiffler's FIT System. If you have a convertible, I like to refer to these cars as "special needs vehicles". These are POSITIVELY necessary with a convertible, you don't have a choice. With a convertible you need the best chassis stiffening you can get your hands on period. Be sure the subframe connectors are being welded on the car with the suspension "LOADED" as it would be on a drive on lift and not with the tires suspended. We have the Stiffler's FIT System listed on our SN-95 suspension order page. |
| BACK TO THE TOP |
| Q: "Are shocks and springs important?" |
| A: Yes, factory shocks and springs are going to give you minimal help in the effort to reduce wheel hop. Particularly if you have a convertible. If you have a convertible you have a 'special needs' vehicle. Ditch the factory convertible springs and shocks as soon as possible. You want a good aftermarket spring and shock combination. It's important to match the shock to the spring. The H&R race springs have been very popular for the Cobra IRS cars. A Bilstein HD shock would be a good match for that spring. Coil-overs would be a little more hard core for people wanting ultimate handling and maximum suspension adjustability but that will come at a cost of increased NVH. |
| BACK TO THE TOP |
| Q: "What does SN-95 and NVH stand for?" |
| A: SN-95 is Ford's code name for the Mustang and Cobra platform covering the years 1994 through 2004. NVH is Noise, Vibration and Harshness. It's a key design criteria for new cars these days. Americans like nice cushy quiet rides. But us "Car Guys" want our power to get to the pavement in the most efficient manner possible. So, bye-bye rubber!!! |
| BACK TO THE TOP |
| Q: "How much increase in NVH will I see with this kit?" |
| A: This is a very subjective question. Most people say they can't hear a difference, some say they hear a little difference and only a handful of people have said they hear a big difference. You won't get the same answer from any two people. The change in NVH after the installation of this kit will hardly be noticeable with the exception of the aluminum front differential mounts. They can sometimes be a little noisy in some cases. Most of the cases with exceptionally significant increases in NVH would be because of poorly set up or badly worn gears, bad bearings or a combination of the aforementioned items. Higher levels of NVH may also come with 3:90, 4:10 or higher gears. If you have an aftermarket exhaust that's loud, it will help mask some of this additional NVH from the front diff mounts and you may not even hear them at all. If you find the gear noise is elevated significantly, you most likely have a differential that needs rebuilding. If you think the noise is excessive you can apply some sound deadening matting available at car stereo shops to minimize the slight increase in NVH. It's a self adhesive matting you put down on the floor pan right above the differential. Take out the lower portion of the back seat and apply the Dynamatting down on top of the floor pan directly above the differential housing. This will absorb and shield the noise from coming into the passenger compartment. Dynamat is available at your local automotive stereo store or Eastwood. Here are a couple of links to videos of test rides after the bushing kit was installed. Jason's test ride Mike's test ride |
| BACK TO THE TOP |
| Q: "How much stiffer will the ride be with these new bushings?" |
| A: The ride ironically enough, will improve and be less harsh.
Unless you are changing springs and shocks at the same time, you will actually see an improvement in the ride. This is because the control arms are now articulating freely as opposed to being bound up like they are with the OEM rubber bushings. Many customers have commented on this as a matter of fact. |
| BACK TO THE TOP |
| Q: "I hear the terms polyurethane, urethane and poly. What's the difference?" |
| A: The terms poly and urethane are simply shortened versions of polyurethane. And there is no place for them anywhere in your IRS assembly. |
| BACK TO THE TOP |
| Q: "I have a cobra with wheel hop. My car is a daily driver, but I want to fix the wheel hop problem and keep a smooth, quiet ride. Is this possible? I want the IRS to be as sturdy as possible, but still have a smooth, quiet ride for the most part. What would you suggest?" |
| A: I get this question a lot. If you want a (and I quote) "smooth and quiet ride" you're going to have to put up with wheel hop. Simple as that. Or get a Lexus to drive as a daily driver. You can't have your cake and eat it too! We are dealing with a Mustang here! Here is what I suggest: Put the complete kit in your car. If you have aftermarket exhaust and stock gears you will hardly hear the front diff mounts. If you hear them a little bit and it bugs you, put down some Dynamatting on the floor pan above the differential. (on the inside of the car underneath the rear seat) The complete transformation your car will make with this kit will rapidly make you forget how much you miss the nice quiet cushy ride! That is about the best answer I can give you! |
| BACK TO THE TOP |
| Q: "Why do I hear a clunk in my drive train?" |
| A: There are a few reasons for this. Your transmission, differential and halfshafts can all combine for quite a bit of play, but that usually is not the MAIN source of the "clunk". A few things can contribute to the Cobra "clunk". #1 - The rear differential support bushing. The rubber OEM differential bushings are designed to handle about 390 RWHP driven in a moderate fashion. That eliminates about 98% of Cobra owners right there. This is what a rear differential bushing looks like after a few years of driving:  (click image to enlarge) #2 - The front differential bushings whether they be OEM rubber or aftermarket poly. These need to be changed. #3 - The front subframe mounting bolts. The 12mm bolts that were originally installed at the factory allow play when applying torque and decelerating. This location is capable of accepting a larger bolt which will hold the front subframe mount more firmly in the chassis and prevent movement. See info above for our 9/16" bolt upgrade part number FT 1600. #4 - The front differential support brace if you're running a 1999-2001 Cobra. The photo below shows three types of front differential support braces. The top brace is what came on Cobras from 1999-2001 along with the 2000 Cobra R. This brace does not incorporate attachment to the front differential mounts like the other braces do. These should be replaced with either of the other two. The center brace is what came on 2003-2004 Cobras and these are fine. These have been on backorder from FORD with no ETA. The bottom brace is Full Tilt Boogie Racing's torque brace. This is a welded steel square tube brace with heavy duty attachment points. These are available on our order page as FT 1291. These are in stock and ready to ship.  (click image to enlarge) |
| BACK TO THE TOP |
| Q: "I have a convertible. What are your recommendations?" |
| A: I like to refer to verts as "Special Needs Vehicles". A FLSFC (full length subframe connector) is absolutely necessary with these cars. It should actually be a first mod. For verts, I like to recommend a matrix system with the FLSFC like Global West offers. I actually like their competition version the best. Once the platform is stabilized then the suspension can be upgraded. So in summary, stiffen platform, remove all rubber from IRS assembly, upgrade springs and shocks and make sure you're on a good tire and you should have wheel hop licked! |
| BACK TO THE TOP |
| Q: "How can I be assured you sell a good product and can be trusted?" |
| A: You need to look no further than our
Testimonials
page. |
| BACK TO THE TOP |
|
Q: "I am ready to order, but I'm not all that familiar with the IRS suspension and what I really need to order. There is a lot of information here and it's a bit overwhelming for me, can you summarize for me?" |
| A: At the minimum you want the FT 5000 bushing kit, which now includes the front subframe mounting bolts FT 1600. If you're doing the job yourself you're also going to want to get the OEM bushing removal tool set FT 2100. These tools will remove a lot of installation pain. You will receive a partial refund when you return the removal tools. (See order page/form for details). If you have upgraded power or in the rare instance you have a driveline vibe now, you're going to want to consider the FT 5001 bushing kit, which includes the more heavy duty FT 1401 Delrin isolated rear diff lowering mount. This will allow you to completely optimize the driveline angles in your car. If you have upgraded power and want your car to handle better, you're also going to want to consider a few other things. First would be our upgraded toe link and bumpsteer kit FT 1860. The bumpsteer and upgraded toe link kit is very important for drag racing and road racing and also very desirable for improving suspension efficiency on everyday drivers. With upgraded power you will also want to consider the new Ford Racing rear diff cover FT 1350 or the machined Ford Racing rear diff cover FT 1350M (see below for more info). This is essential for drag racing but is also has provisions for a diff cooler if you plan on road racing or serious track day duty. The rear cover significantly raises the durability of the IRS. NOTE: If you are combining the FT 1401 Delrin isolated rear diff lowering mount (included in the FT 5001 kit) AND the new Ford Racing diff cover, you are going to want to opt for the FT 1350M machined Ford Racing cover we offer because lowering the rear of the differential will cause clearance issues with the inner toe link mounts on the subframe. As an even better option you also have the FT 51001 and FT 1350M combination kit. If you're interested in saving 5% by sending a check, you can download the order form at the bottom of the order page. Fill the form out on your computer and it will automatically calculate prices, discount and freight for you, print it out and mail it in with your payment. You will also find a link on our site for installation tips and photos: http://www.fulltiltboogieracing.com/installation.htm And also a full compliment of videos as well: http://www.fulltiltboogieracing.com/SN-95_Videos.htm There are many benefits of the Full Tilt Boogie Racing IRS bushing kit. It raises the efficiency level of the IRS, it reduces wheel hop dramatically and you will regain control of the rear end of your car. This is important for everyday driving and it's also critical for drag racers, road racers and track day participants. The IRS is half as efficient as the front suspension because it has twice as many control arms. When these control arms are mounted in rubber, they deflect to the path of least resistance and not where you want them positioned for maximum efficiency. Something you don't have now with an OEM rubber or aftermarket poly bushed IRS assembly. |
| BACK TO THE TOP |
| Q: "How does the kit perform?" |
| A: It is state of the art on track. You won't believe how the car handles. The car drives like it's on rails. Check out a few examples of Bruce's favorite pastime on his track website. http://www.trackdawgz.com/Cobratrackpage.htm For drag racing and street performance, this kit also increases the efficiency of the IRS to keep the wheels pointed in a forward direction. Rubber in the IRS is your enemy and the more power you have, the more you need to upgrade your IRS assembly. |
| BACK TO THE TOP |
| Q: "What is the maximum horsepower you can run using your kit?" |
| A: We used to tell people that realistically 800 RWHP was the limit for the IRS until we had a customer with over 1,000 RWHP running our kit. Click here for link. |
| BACK TO THE TOP |
| Q: "Can I expect this kit to cure my wheel hop like waving a magic wand over the car?" |
| A: No. Although this kit eliminates ALL of the rubber in the IRS assembly, eliminates all control arm deflection and raises the efficiency of the OEM IRS to a completely new level, it's not a cure all in every single instance. About 2-5% of our customers still have some minor lingering wheel hop issues after installing the kit. Usually they have a convertible, are on a hard stiff sidewall tire like a Good-Year Eagle F-1 or don't have subframe connectors. All of the information contained in this FAQ has been compiled to inform everyone of the things that need to be done to the car to make it rigid enough to be hop free. |
| BACK TO THE TOP |
| Q: "What procedure do I use to apply the windshield banner and decals?" |
| A: Thoroughly clean the glass where you plan to apply the decal. Wet the glass and the back side of the decal with a spray bottle of distilled water. Windex will also work. Apply the decal and push out the air bubbles with your fingers or a soft sponge. Be careful not to scratch the decal by using a credit card or a squeegee. Trim the excess with a sharp razor blade. |
| BACK TO THE TOP |
| Q: "Where can I find the torque specs for the fasteners on my car?" |
| A: The torque specs can be found
HERE |
| BACK TO THE TOP |
| Q: "What is the thread size on the end of the halfshaft for the halfshaft to hub retaining nut?" |
| A: This thread is a 24x2mm thread which means the diameter is 24mm and the pitch of the thread is 2. Meaning a distance of 2mm for each thread. |
| BACK TO THE TOP |
| Q: "I just finished installing your kit. I am having a small issue, it seems whenever I turn or go over a
bump I get a clunking noise. Any suggestions on what could be causing this?" |
| A: The clunking noise sounds like something is loose. Especially if it only happens when going over bumps. It could be a shock, subframe bolt or even a swaybar end link. You will need to go over the car and double check every fastener that was touched during the install, and make sure they are torqued to specs. |
| BACK TO THE TOP |
|
Q: "I just finished the installation of the bushing kit and now I am hearing a scraping sound coming from the IRS. What could it be?" |
| A: Many times this is the rear splash shields on the knuckles. When they are off of the car during the bushing kit installation, it's very easy for them to bend and distort. They sometimes drag on the rotors. That 'may' be what you're hearing. You will have to take a close look at it before you can eliminate that as the possible sound you're hearing. |
| BACK TO THE TOP |
| Q: "I see you now carry a fuel filter, why?" |
| A: The reason we now carry a replacement fuel filter is convenience. The fuel filter is located directly above the IRS, so as long as you have the IRS out to do the bushing install, it is the most convenient time to replace the fuel filter.  |
| BACK TO THE TOP |
| Q: "I was thinking about upgrading my front suspension before upgrading my IRS, what are your thoughts?" |
| A: Your plan is a bad one for several reasons. Your front suspension is already more that twice as efficient as the rear suspension. The biggest problem with the IRS is, it is half as efficient as the front suspension because it has twice as many control arms as the front suspension. And to make matters even worse, the rear suspension is also expected to supply propulsion for the vehicle. This complicates matters and puts even more demand on the rear suspension. All of the IRS control arms are mounted in rubber bushings from the factory and these rubber bushings are allowing all FOUR of your IRS control arms to deflect to where ever they desire. Unless you replace those OEM rubber or aftermarket poly control arm bushings with Delrin, you will continue to have control arm deflection. |
| BACK TO THE TOP |
| Q: "I'm putting an IRS from an '03-'04 Terminator into my 1999-2000R or 2001 Cobra. What if anything do I need to be aware of?" |
| A: There are a few subtle differences in the IRS throughout the years but the significant difference is that the Terminator IRS uses a larger diameter pinion flange that measures 5.050" in diameter. Your 1999-2001 Cobra IRS has a pinion flange diameter of 4.300" and your driveshaft will not bolt up to the Terminator pinion flange. You need to change the pinion flange on the '03-'04 IRS to the E9SZ-4851-A that we sell on our 1999-2004 Cobra and our 2000 Cobra "R" suspension order pages. This pinion flange theory also works in reverse, so people that have '03-'04 Terminators also need to be aware of this if they are putting an IRS from a 1999-2001 into their Terminator. |
| BACK TO THE TOP |
| Q: "Is there any time frame for the return of the OEM bushing removal tool set FT 2100 for the credit?" |
| A: There is NO time frame for the return of the FT 2100 removal tools. We have had people return them after two years. Some people don't return them at all which is why we need to charge what we do for them. To get your refund, send the tool kit along with the purchasers name and address and approximate purchase date to: Full Tilt Boogie Racing 1817 Dolphin Drive Waukesha, WI 53186 |
| BACK TO THE TOP |
| Q: "What are the differences between the IRS assemblies in Terminators (2003-2004) and earlier models (1999-2001)?" |
| A: The Terminators have a 2" tall inner toe link connection point. The 1999-2001 subframes (including the 2000 Cobra R) have a 1.750" tall inner toe link connection point. The Terminator pinion flange is 5" diameter. The pinion flange on early models (1999, 2000 Cobra R and 2001) was 4.300" diameter. The Terminator has triangulated inner halfshaft stubs. The earlier models had round ones. ALL IRS cars have a 28 spline outer halfshaft stub and ALL IRS hubs for ALL years have 28 splines 1999 Models had 28 inner spline halfshafts that went into the differential and 2001 and up models had 31 spline 2000 Cobra R had unique left and right halfshafts that were different lengths that can be replaced with Terminator halfshafts once the gear carrier has been upgraded to a Terminator version. |
| BACK TO THE TOP |
| IRS, Solid Axle, Half Shafts, Cross-Axis Joint FAQ's |
| Q: "Everyone is talking about a solid axle swap and I'm thinking about doing it, what is your opinion?" |
| A: Hogwash I say! If you don't care about handling or ride, then you won't miss your IRS. My advice to you would be give the IRS a chance. The IRS is a FAR superior suspension component than the archaic stick axle. There is a reason why every sports car from every major manufacturer comes from the factory with an IRS. How many true sports cars have SRA's in them? Well none actually! Unfortunately for Cobra owners, they have a sour taste in their mouth regarding the IRS. The IRS was delivered from the factory in a very poor state. You really need to remove ALL of the rubber (and or aftermarket poly) from the entire assembly including the subframe. The only way I would recommend a stick axle would be if you had a dedicated drag car that you trailered to the drag strip. |
| BACK TO THE TOP |
| Q: "There has been a lot of talk regarding solid rear axle (SRA) conversions, I'm undecided on what to do, what's your opinion?" |
|
A: Well the simple answer is this: If you're more concerned about drag racing and going fast in a straight line and you're less concerned about quality of ride and handling, then a SRA conversion will serve you fairly well. But you need to remember, a Cobra is a more expensive vehicle than a Mustang GT because it has upgraded components on it that cost additional money. And an IRS is considered one of those upgraded components. But...................... The more complicated answer is this: If you're a very sharp mechanical engineer, and you've spent many years researching, designing, developing, testing, racing and executing the production of motor vehicles and suspension systems, there is still a very slim chance you'd be more knowledgeable than a team of SVT engineers. SVT engineers came to the ultimate conclusion that the SVT product line would be better served with an IRS under it. It unfortunately came quite compromised due to NVH requirements which has led to many of it's issues and unpopularity, particularly as the rubber suspension bushings age and wear. Numerous centuries ago when wagons were built to be pulled behind oxen and horses, the SRA was axle of choice. Roman's put SRA's on chariots. The first motor vehicle produced back in the late 1800's had solid axles on it as well. Both front and rear. As you may have guessed suspension systems, just like anything else have improved in design over the years. Almost every vehicle on the road now has an independent FRONT suspension on it with the exception of four wheel drive vehicles. Independent REAR suspension systems have become so popular due to improved ride and handling that they don't just come on high performance sports cars any more. They also come on pony cars, two and four door sedans, sport utility vehicles, mini vans and many other vehicles as well. There is a reason that every high performance sports car manufactured today, comes from the factory equipped with an IRS. The SVT Cobra Mustang, considered a pony car, is one of many high performance cars that came with an IRS. The Corvette, which is without a doubt one of America's most successful sports cars, came with an IRS starting in 1963. That's more than forty six years! These cars all came with an IRS for a reason. Their manufacturers decided these car would be better served with an IRS under them for improved ride quality and superior handling. Yes, handling can be improved to a SRA adding things like a torque arm, panhard bar or a watts link. But they will never be an IRS. Some people like the idea of swapping to a SRA because they will reduce their vehicle's weight by about 150#. This is fine for drag racing but for street manners you are making a vehicle that already has a lopsided F/R weight distribution of 57/43 (for an '03-'04 Cobra Mustang for example) even MORE unbalanced. One other thing to keep in mind is a SRA will add a substantial amount of unsprung weight to the rear suspension. Some people run these GT axles with GT rear brakes. Brakes are a safety item and for people that are making their cars faster with aftermarket parts should not be downgrading their brakes. They should be upgrading them. Cobras are more sophisticated vehicles than a Mustang GT for numerous reasons, making them considerably more expensive. They have a higher performance engine, sometimes equipped with a supercharger, better transmission, improved brakes, wheels and SUSPENSION including the IRS. These cars are already depreciating fast enough without downgrading the rear suspension to that of a Mustang GT. Be certain what you are deciding to do with your car. In closing I'd like to say the ultimate decision is in your hands. It's your car, do with it what you want. |
| BACK TO THE TOP |
| Q: "Do I need level 5 halfshafts?" |
| A: Most likely not. The 1999 halfshafts are really not sufficient for mildly to highly modded cars drag racing with slicks or DR's
even after you remove all of the rubber in the IRS assembly preventing wheel hop. Your best bet at that point would be to upgrade to a 31 spline gear carrier and install '03 halfshafts. If you then break one of the '03 Ford halfshafts, AND you have removed ALL of the rubber from your IRS assembly, you may need to look to the aftermarket. We have customers that have proven once you remove all of the rubber in the entire IRS assembly, you can successfully run well over 600 RWHP with OEM Terminator halfshafts. The '01 Cobras have a 31 spline halfshaft but they are not quite as stout as the '03 style. If you have an '03 - '04 you have a pretty stout halfshaft already. Have you broken any of these Ford halfshafts? If you answered yes, then possibly? But ONLY if you've removed all of the rubber in your IRS assembly and still broke a halfshaft. IMHO more halfshafts have been broken due to the flopping of components mounted in rubber, than broken because of sheer power. This includes L-5's. Also, as previously mentioned, a tire with a very stiff sidewall like a Good-Year Eagle F1 will not absorb a lot of the shock of a launch and will contribute to halfshaft failures. Once all rubber is removed from the IRS assembly and you break a halfshaft, then by all means you're a candidate for looking into the aftermarket. |
| BACK TO THE TOP |
| Q: "I have a halfshaft retaining nut that keeps coming loose, why is this happening?" |
| A: The halfshaft retaining nuts do have a tendency to come loose over time. They need to be monitored. The torque on the rear halfshaft to hub retaining nuts should be checked on a regular basis, like at least every oil change or more often. If you're going to the track with the car they should be checked before every event with a 36mm deep impact socket and torqued to 240-250#. If the nut comes loose, the preload on the bearing is lost. If this happens, the bearing will self destruct in short order. If it is run in this loose condition for an extended period of time this will also eventually destroy the hub. Once the hub is destroyed, no nut will ever stay tight on there. You need to replace the hub, nut and the bearing. We sell the Timken double tapered roller bearings FT 6601. We also sell our house brand bearing FT 6602 which is a heavy duty, double tapered roller bearing like the Timken. The Ford halfshaft retaining nuts FT 6500A and the 36mm deep sockets FT 3600 can be found on our SN-95 suspension order page. The nuts are a one time use item. We recommend only using the heavy duty double tapered roller bearings and not an aftermarket ball bearing. Do NOT buy cheap ball bearings from an auto parts store. This is not a place to save $10.00, trust me. The ball bearings will have a significantly shorter life span and when you see how much labor this job takes you won't want to do it again any time soon. You can place a couple drops of red Loc-tite permanent thread locking compound on the shaft threads when you install the retaining nuts before you torque them. |
| BACK TO THE TOP |
| Q: "I see that you offer a 36mm socket. What's it for?" |
| A: The 36mm socket is a tool that EVERY Cobra owner should own. This socket will allow you to check the torque (240-250 lb. ft.) of your rear halfshaft to hub retaining nuts. This should be done at every oil change if you're a street driven car or before every racing event. (1/4 mile or road course) This socket, along with a 1/2" drive torque wrench that goes to 250#, belongs in the tool box of EVERY single person that owns a Cobra and works on it themselves. This socket will also fit the retaining nut on your SN-95 front hubs and allow you to change those yourself. Ford calls for a front hub nut torque of 188-254 lb. ft. or 255-345 Nm. |
| BACK TO THE TOP |
| Q: "I see you are now offering cross axis joints. What can you tell me about them and do I need them?" |
| A: We are offering the cross axis joints for several reasons. The first reason is because they are not available from Ford individually unless you buy them in a complete knuckle assembly. The list price of a knuckle assembly from Ford as of May, 2010 is over $600.00. The second reason is because our competitors only sell them in a set of four and you normally only need to replace them one at a time. The lowers will typically wear out faster than the uppers. Replacing the joint with our unit is not an 'upgrade' in performance. The OEM joints are just fine unless they get play in them and then they need to be replaced. If your joints have play in them they need to be replaced. We sell them individually as part number FT 6100 and can be found HERE The cross axis joints can also be purchased in a set of four that also include the removal and installation tools. That is part number FT 6120. One thing I'd like to mention is the fact that it is very common for the OEM boot seals to tear or rip on these joints from mis-handling, but that in itself does not mean the joint is bad or needs to be replaced. If you have torn boots and the joint is still tight you can clean the boot up and repair it with some black Permatex RTV if the boot is not torn too badly. If the boot is destroyed you can replace them with our replacement boots FT 6106 found on the order page on our web site listed above. You can check the joint for play by jacking up the car and wiggling the wheel from the 12 and 6 O-clock positions and also the 3 and 9 O-clock positions. If the knuckle is off the car you can check it for side to side movement by putting the joint in a vice and trying to move the knuckle side to side. If the joint has no play it can be used. If it has play it needs to be replaced. A couple things that typically destroy these joints would be road racers or open track participants that run race slicks will typically wear out these joints, the left lower in particular. Road racers should also protect these lower joints from rotor heat with a home made heat shield because of the close proximity of the rotor to the joint. The other reason would be impact with a curb after losing control of the vehicle. Many times after this occurs the inner portion of the joint will crack and the joint itself will have excess play from the impact. |
| BACK TO THE TOP |
| Q: "I'm changing the knuckle bearing and need to know if my hub is ok. How can I tell if the hub can be reused?" |
| A: You will have to check two things on the hub. The first thing would be to get a micrometer and check the bearing diameter. This diameter needs to be 1.654" at the minimum. If it's not, the hub needs to be replaced. If the hub passes that test, next thing to check are the internal splines. Take the hub and push in on over the splines on the halfshaft. The hub should stop a minimum of 3/8" and preferably about 1/2" from bottoming out against the body of the CV joint. (the nut pulls it on the rest of the way) If the hub goes within about 1/4" of the CV joint body you are taking your chances with that hub and it should be replaced to be safe. If the hub bottoms out there, the splines are worn out and the hub will need to be replaced for sure. To give you an example, a brand new hub stops approximately 1" from bottoming out against the CV joint body when placing it on the halfshaft by hand. The halfshaft retaining nut will pull it on the rest of the way when it is torqued to 240# - 250# with a 36mm socket. |
| BACK TO THE TOP |
| Q: "How can I tell if I have the recalled knuckle assemblies on my car?" |
| A: You must inspect the cross-axis joints to see if you have the recalled knuckles. If they have no flange and no retaining ring on them, you have the recalled knuckles. Click here for more information. |
| BACK TO THE TOP |
| Q: "What is the FT 6650 snap ring used for?" |
| A: The FT 6650 is the snap ring that holds the bearing in the knuckle. |
| BACK TO THE TOP |
|
|
| Q: "I keep cutting halfshaft boots on the car. What is causing this?" |
|
A: Overheating the CV joint will inflate the boot on the
halfshaft. This happened to me only on the driver's outside boot road racing the car. Venting the boot will prevent that. Take a straw from a WD-40 can and slip it under the little gap on a worm screw clamp. That will vent the boot and prevent it from inflating. Centrifical force will keep the grease inside and it will not leak from this vent. Click here for more information |
| BACK TO THE TOP |
| FTBR IRS Delrin Bushing Kit FAQ's |
| Q: "How hard is this job?" I'm comfortable doing a clutch job?" |
| A: If you can do a clutch, you can do this. The more tools you have at your disposal the better. Get a competent friend to help. Supply the food and beer. It will be worth it. |
| BACK TO THE TOP |
| Q: "How long will the job take?" |
| A: This job is a considerable undertaking. It requires some car wrenching skills and an assistant. An assistant will make the job go much easier. Two heads are always better than one. If you start on a Friday after work, you should have the IRS out of the car in a couple of hours. You can finish the night taking apart the IRS for the bushing install. Saturday you will spend installing the bushings, reassembling the IRS and hopefully getting the IRS assembly back in the car. Speed depends a LOT on the people doing the job and the amount of tools/equipment at your disposal. You always have Sunday to finish up in case you run into some snags. If you can locate someone that's done the job once or twice before, you might be able to knock the job out in 6-8 hours with two people. If you have a couple of knowledgeable people that are good wrenches, a lift, air tools, a trans jack and a well equipped shop you could knock this job out in four or five hours. |
| BACK TO THE TOP |
| Q: "I've done a bit of work on my car in the past. Do you think this is a job that can be tackled at home?" |
| A: Take a look at the installation videos we shot recently on our YouTube video page. https://www.youtube.com/user/FullTiltBoogieRacing/videos It shows all of the preparation steps involved in the project, the removal of the subframe from the chassis and the subframe prep and bushing install. This will give you a much better idea if you feel comfortable doing the job yourself. Prep and IRS removal from chassis, Subframe disassembly and prep Part 1, Subframe disassembly and prep Part 2, and Subframe Install. |
| BACK TO THE TOP |
| Q: "I'm not comfortable doing this job, how much should I expect to pay for installation of the kit?" |
| A: If you are not comfortable doing this job yourself, installation cost varies by the shop.
It's about a 8-10 hour job. The low end for labor would be in the $1,200.00 $1,500.00 range. But to be honest, don't expect a lot of shops to do it for that. On the higher end, you're looking at possibly as high as $1,800.00 or more for the FT 5000 or FT 5001 basic kit. Installation of the Ford Racing reinforced diff cover, bumpsteer kit and bumpsteering the IRS would all be additional. |
| BACK TO THE TOP |
| Q: "What if any surprises might I expect installing the kit?" |
| A: Because there is no "exact" location or position to weld the full length subframe connector to the rear uni-body frame members,
sometimes there can be a certain amount of interference depending on the location it was welded. One installer had to grind about 1/16" of off each side to get the subframe back in with the new UHMW bushings in place. Another installer had interference of nearly 1/4" on each side. This required a sawzall and a re-weld patch afterwards. Those were the only two instances so far, so I think it's a pretty rare occurrence to have this issue on your install. But I did want to bring it to everyone's attention. |
| BACK TO THE TOP |
| Q: "What would you suggest if I wanted to do this in steps?" |
| A: This project is a considerable undertaking. It's not an easy job. There is quite a bit of labor involved to drop your IRS assembly, replace all of the bushings and re-install it. There really is no good way to do the job in stages. You REALLY want to do it all at once and get it over with in one fell swoop! If you can't afford the kit, I suggest you wait until you can buy the entire kit. It's sort of like the question "All of the tires on my car are bald, I can only afford two, which two should I replace first, the fronts or rears?" All of the components in this package work in conjunction with each other. The key to the kit is the removal of ALL the rubber. Removing some or most of the rubber is only going to give you a marginal result. |
| BACK TO THE TOP |
| Q: "I'm thinking of just doing the subframe bushings and diff bushings for now and probably the UCA/LCA bushings later on. Will that be ok? Will I notice a big difference when I do the control arm bushings after the subframe and diff bushings?" |
| A: I don't like your bushing installation plan for a couple of reasons. Both the subframe AND UCA bushings require the removal of the subframe from the chassis. You really don't want to remove the subframe from the chassis any more times than you absolutely have to. But if you are on a crazy tight budget you're just going to have to do double labor. There really is no way around it. In order of importance, this is how you should do it, if you absolutely HAVE to do it in stages: 1st - Front and Rear Diff mounts. 2nd - UCA and LCA control arm bushings. 3rd - Subframe bushings. 4th - Bumpsteer kit with upgraded toe links. |
| BACK TO THE TOP |
| Q: "I see you offer two IRS bushing kits, FT 5000 and FT 5001. What's the difference in these two kits?" |
| A: The FT 5000 bushing kit replaces all of the critical rubber OEM bushings in your IRS. It has a Delrin rear diff support bushing which replaces the OEM rubber and utilizes the factory rear diff support bracket. With this kit you can improve your driveline angles compared to how your car came from the factory, you just can't completely optimize it. In the rare case you have a driveline vibe now, you're going to want to consider the FT 5001 bushing kit which includes the Delrin isolated rear diff lowering mount FT 1401. This will allow you to completely optimize the driveline angles in your car. Or if you have upgraded HP you will also want to opt for the FT 5001 kit because you will get the much stronger FT 1401 Delrin isolated rear diff lowering mount. NOTE: If you are combining the FT 1401 Delrin isolated rear diff lowering mount (included in the FT 5001 kit) AND the new Ford Racing diff cover, you are going to want to opt for the FT 1350M which is a machined Ford Racing cover. We offer this because lowering the rear of the differential will cause clearance issues with the inner toe link mounts on the subframe. |
| BACK TO THE TOP |
| Q: "What components am I NOT getting with your kit compared to the kits of your competitors?" |
| A: There is NOTHING you're not getting with this kit. A bumpsteer kit is included in some of the more expensive 'packages' from our competitors. Ours is sold separately. |
| BACK TO THE TOP |
| Q: "What does your kit offer that I'm not getting from your competitor's kit?" |
| A: Our kit has an anti-wear Hardcoat on the aluminum inner sleeves for the control arm bushings.
You don't get that with the our competitor's kits. Many people have worn out the steel inner sleeves for the control arm on our competitor's kits. One competitor in particular only offers a polyurethane (poly) subframe bushing. Poly is only marginally better than the OEM rubber that originally came in the car from the factory. The UHMW pieces you get with this kit will hold your subframe infinitely more firmly than a poly bushing. This is important for the elimination of wheel hop. We also offer grease fitting kits for a long trouble free life of silent operation of your kit. Our competitor's rely on their assembly lube to lubricate the bushings for life. |
| BACK TO THE TOP |
| Q: "Are there instructions included?" |
| A: Yes. The kit comes with EIGHT pages of VERY comprehensive detailed installation instructions. In addition to the detailed instructions included with the kit we also have many detailed photos on our site to assist in the installation procedure. These photos can be found under the link on our site titled Installation Photos and Tips. |
| BACK TO THE TOP |
| Q: "Do I really need the removal tools you offer to remove the OEM bushings?" |
| A: In a word, ABSOLUTELY!! Many people have commented on how much time they have saved and how efficient the removal tools are. They cost you a little bit up front but there is a nice deposit you will receive upon their return. |
| BACK TO THE TOP |
| Q: "Is there anything else I should do while I have the IRS assembly out of the car?" |
| A: Yes. Because the fuel filter is very difficult to get at with the IRS assembly in the car, as long as it's out, now would be an excellent time to change your fuel filter while you have full unrestricted access to it. Another thing would be to torque your rear halfshaft to hub nuts at the conclusion of this job. Many have had these nuts come loose and once they come lose they can damage the hub AND knuckle bearing. You're going to need a deep 36mm socket and a torque wrench. Torque those bad boys to 250#. BTW, these nuts should be torqued every 2-3 months for street cars and before every event for track and race cars. |
| BACK TO THE TOP |
| Q: "Lastly on your bushings and I know you don't recommend this, but it is too costly for me in one shot to buy the whole kit from you, so is there a set you recommend that I could do while the IRS is still out of the car and purchase the other bushings at a later time that won't be to difficult to install when is in the vehicle?" |
| A: If you're on a crazy tight budget you need to do the front and rear diff supports as a first priority. Then the UCA bushings and the subframe bushings would be next on the list because they BOTH require the removal of the subframe from the chassis. Trust me, you don't want to do this job anymore times than you have to. Then at a later date you can do the LCA's which BTW are the most expensive of all the bushings. So you'd need front and rear diff mounts, UCA set, subframe set, a grease fitting kit and upgraded front subframe bolts. But keep in mind the LCA's do a majority of the work in the IRS. The FT 5000 bushing kit replaces all of the critical rubber OEM bushings in your IRS. It has a Delrin rear diff support bushing which replaces the OEM rubber and utilizes the factory rear diff support bracket. With this kit you can improve your driveline angles compared to how your car came from the factory, you just can't completely optimize it. In the rare case you have a driveline vibe now, you're going to want to consider the FT 5001 bushing kit which includes the Delrin isolated rear diff lowering mount FT 1401. This will allow you to completely optimize the driveline angles in your car. NOTE: If you are combining the FT 1401 Delrin isolated rear diff lowering mount (included in the FT 5001 kit) AND the new Ford Racing diff cover, you are going to want to opt for the FT 1350M machined Ford Racing cover we offer because lowering the rear of the differential will cause clearance issues with the inner toe link mounts on the subframe. |
| BACK TO THE TOP |
| Subframe FAQ's |
| Q: "Do I need subframe connectors?" |
| A: Yes absolutely, any SN-95 chassis needs a good Full Length Sub Frame Connector. There are many subframe connectors available on the market today. We recommend Stifflers FIT system because they don't just rely on one connecting rail, they also have a Matrix bracing that connects onto the main connecting rail and jacking rail. This gives you a much more rigid platform structure. We offer the Stiffler's FIT system here: 1999-2004 Cobra Suspension Parts and Tools If you have a convertible, we like to refer to these cars as "special needs vehicles". Sub Frame Connectors are POSITIVELY necessary with a convertible. In fact, if you have a convertible, you are going to want to make sure you opt for the Stiffler's FIT system to get the matrix bracing. With a convertible you need the best chassis stiffening you can get your hands on, PERIOD. Be sure the subframe connectors are being welded on the car with the suspension "LOADED" as it would be on a drive on lift and not with the tires suspended. |
| BACK TO THE TOP |
| Q: "I hear the terms polyurethane, urethane and poly. What's the difference?" |
| A: The terms poly and urethane are simply shortened versions of polyurethane. And there is no place for them anywhere in your IRS assembly. |
| BACK TO THE TOP |
| Q: "What is UHMW?" |
| A: UHMW is Ultra High Molecular Weight Polyethylene. It's a great material and there is a specific reason we chose it for the subframe bushings. |
| BACK TO THE TOP |
| Q: "Where is the bolt that rubs on the wide rear tires?" |
| A: Those are the rear subframe mounting bolts. I don't like the aftermarket "button head" bolts because they have soft heads and they tend to strip out when you try to remove them after a few years. I prefer to grind about half the head of the bolt off. This will leave plenty of head to remove with a six point socket when necessary. |
| BACK TO THE TOP |
| Q: "Why do I need the 9/16" bolts and where do they go?" |
| A: Your car came from the factory with a 12mm bolt holding the front portion of the subframe into the chassis. This attachment point has the capability of accepting a 14mm bolt or what we prefer to use, a 9/16" bolt. The 14mm bolts are much more expensive which is one of the reasons we have substituted the 9/16" grade 8 bolt in it's place. The 9/16" bolt is also stronger than the 14mm bolt and requires more torque at installation. The 14mm bolt has a minimum diameter of 12.7mm or .500" on it's main shank diameter as compared to the 9/16" bolt that has a minimum diameter of .557". This is going to hold the front of the subframe infinitely more securely in the chassis because it does not step down in a critical area where the bushing inner sleeve needs to be secured. The stronger and better suited 9/16" Grade 8 bolt is ironically more readily available and coincidently less expensive than the higher priced and weaker 14mm bolt. This kit is all about getting the job done as economically as possible without sacrificing quality or integrity in any way shape or form. |
| BACK TO THE TOP |
| Q: "What is the easiest way you have found to remove the OEM subframe rubber bushings?" |
| A: The removal of the OEM subframe bushings can be difficult. One of the easier way we found is to heat the outer metal surrounding the subframe bushing to about 350 to 400 degrees. This will break the vulcanizing and the bushing will slide right out. Remember, the flanged outer metal sleeve on the subframe bushing stays in the subframe!! Do NOT remove it! Only remove the rubber bushing. Check out our informational videos. http://www.fulltiltboogieracing.com/informational_videos.htm |
| BACK TO THE TOP |
| Q: "I accidently removed the outer metal sleeve when removing OEM subframe bushings, now what do I do?" |
| A: No problem, we make an oversize subframe bushing set just in case that happens. The part number for the oversize set is FT 1515 and sells for $150.00 If the subframe bushing set you purchased from us is completely unused and re sellable we will give you full credit for it. Just contact us at info@fulltiltboogieracing.com. |
| BACK TO THE TOP |
| Upper and Lower Control Arm FAQ's | |
| Q: "A few years ago I installed Maximum Motorsports IRS bushings in my car and now I am experiencing a LOT of play in my upper control arm. What's causing this?" |
|
| A: This is a VERY common problem that many users of MM Delrin IRS bushing kits have experienced. There are a few inherent design issues with these parts and it will not take long for this excessive play to manifest itself as an ill handling car. Once you replace those with our parts, your problems will be gone. Check out the video footage showing the play in a set of MM upper control arm bushings on our YouTube page. https://www.youtube.com/user/FullTiltBoogieRacing/videos |
|
| BACK TO THE TOP | |
| Q: "What type of grease should I use for installation of the delrin bushings?" | |
| A: Any good quality synthetic blend chassis grease will work fine. |
|
| BACK TO THE TOP | |
| Q: "What type of grease should I use to lubricate the delrin bushings after installation?" | |
| A: Any good quality synthetic or semi-synthetic chassis grease. |
|
| BACK TO THE TOP | |
| Q: "I am in the process of reinstalling the Lower Control Arms back into the subframe after installing the delrin bushings, and I noticed the right side has about 3 shims of excess space and the left side has only about 2 shims of excess space. Is this normal?" |
|
| A: Assuming there is a single shim on both of the front outer bushings, it's ok to have mismatched shim quantities as long as its only by one. Be sure the shims go in effortless without forcing them. |
|
| BACK TO THE TOP | |
| Q: "I am reinstalling the Lower Control Arm back into the subframe and I am having an issue getting the bolt through both sides of the LCA bucket.
What should I do?" |
|
| A: Take the bushed Lower Control Arm with the inner sleeves installed and dry fit it into the subframe with the LCA bolts. If misalignment is encountered, the misaligned hole will need to be relieved with a rat tail file, Dremel tool or a rotary burr until the bolt slips through without resistance. |
|
 |
 |
| LCA bolt misalignment | LCA bolt correction |
| BACK TO THE TOP | |
| Q: "What is the easiest method to cut the OEM upper control arm bushing flange for the bushing removal tool to fit?" | |
| There are several methods you can use to remove the flange edge for the removal tool to fit. The easiest is to use pneumatic or electric grinder with a cut off wheel. You could also use a hack saw, but make sure you are using a metal cutting blade. Remove enough of the flange for the tool to sit flush on the upper control arm. The flange should be at about 1.750" across. Click here for more info. |
|
| BACK TO THE TOP | |
| Front and Rear Differential FAQ's | |
| Q: "My differential housing cover has a slight leak. Should I reseal it when I install the bushing kit?" | |
| A: Yes, absolutely. You will have complete and total access to the differential and the rear cover when you install the bushing kit. Some people like using the lube locker gasket. I have always had good luck with the gray Motorcraft sealant. Make sure you let the sealant cure for 24 hours before putting the gear lube in. Make sure you use 75-140 synthetic gear lube. If you are going to be using the Ford synthetic gear lube you will also have to add the Ford friction modifier if you are on the original clutch differential set-up. You won't need the friction modifier if you're using Amsoil or Royal Purple. |
|
| BACK TO THE TOP | |
| Q: "My rear cover is leaking.(again) Why does this keep happening?" | |
| A: The rear cover leaks or keeps leaking because the differential housing is not stabilized. It's impossible to stabilize the differential in OEM rubber (even if new) or aftermarket poly. Once the differential is stabilized, the rear cover will stop leaking. In higher power level cases, (500 RWHP and up) or drag race applications, you are going to want to upgrade to the milled version of the Ford Racing reinforced differential cover FT 1350M we offer. You will also need to upgrade the differential mounts to our front FT 1200 and rear FT 1401 if you haven't already. (you will need the milled version of the Ford Racing diff cover when using the FT 1401 Delrin isolated rear diff lowering mount) If you want to run a diff cooler you will need the FT 1401M Delrin isolated rear diff lowering mount. When you reseal the rear cover, use the gray Ford silicone sealant in generous amounts. Make sure you're starting with a very clean surface. Don't put lube in for 24 hours allowing the silicone to fully cure. |
|
| BACK TO THE TOP | |
| Q: "I just purchased the FT 1350/FT 1350M rear differential cover. What is the installation procedure and what are the torque specs for the hardware?" |
|
| A: Installation instructions: (Copied directly from Ford Racing's installation instruction sheet) FORD M4033-G3 Diff Cover inst.pdf Step 1: Remove axle housing. Refer to Ford Factory shop manual. Step 2: Remove rear cover. Check all internal components for visible defects and repair/replace at this time. Step 3: Clean housing and axle girdle surfaces with brake and parts cleaner. Apply a generous bead of the gray FORD Motorcraft sealant (TA-29) to both the cover and housing surfaces. Allow solvent to evaporate. Step 4: Install the girdle with the supplied bolts and washers. Make sure the load bolts are backed out sufficiently so they will not contact the differential bearing caps while installing the girdle. Step 5: Torque the girdle to the axle housing bolts to 20-25 ft./lbs. Re-check torque after 10 minutes. Step 6: Remove all plugs from axle girdle and apply pipe sealant to threads. Re-install all plugs and torque to 25 ft./lbs. Step 7: Tighten the two load bolts until they make contact with the differential bearing caps. Step 8: Torque the load bolts to 5-10 ft./lbs. Excessive torque can damage the differential bearings! Torque the jam nuts to 25-30 ft./lbs. Step 9: With the axle housing installed, remove fill level plug (below RH side load bolt), fill rear axle with recommended lube from the upper hole in the girdle until fluid runs out of the fill hole. Re-install plugs. Torque to 25 ft./lbs NOTE: Axle girdle has provisions for oil cooler fittings. Pickup at the bottom of cover, return above the RH load bolt. |
|
| BACK TO THE TOP | |
| Q: "Where can I find the instruction sheet for the 8.8 Ring and Pinion installation?" | |
| A: Here is a link to the instructions on Ford Performance's website. https://performanceparts.ford.com/download/instructionsheets/FordInstShtM-4209-8.pdf |
|
| BACK TO THE TOP | |
| Q: "Do I need a rear cover brace?" | |
| A: The aftermarket rear cover brace was a
Band-Aid to strengthen the egg shell thin OEM cover. This obviously worked at the time and it saved many a differential cover from being cracked or broken. Almost all applications today require upgrading the egg shell thin OEM diff cover. If you already have a cover brace it's better than nothing, but the real fix currently would be the new reinforced Ford Racing diff cover that we now carry. If you have upgraded power, like to drag race or drive aggressively on the street, these activities all require strengthening the rear cover. If you upgrade to the new Ford Racing diff cover that would eliminate the need for the rear cover brace. The brace will not fit aftermarket covers as it is designed to work with the OEM cover only. |
|
| BACK TO THE TOP | |
| Q: "I was going to buy only one of your differential mounts and was wondering if leaving the other diff mount in OEM rubber or aftermarket poly will have a negative effect?" |
|
| A: Your plan for the diff mounts is a bad one. You never want to have only one end of the differential housing stabilized with one of our mounts and leaving the other end mounted with OEM rubber or aftermarket poly. You would run the risk of damaging the rear cover or mount or cracking or breaking one of the front mounting ears with that combination. For instance if you're replacing the front mounts with aluminum and leaving the rear rubber or poly, that would run the risk of cracking the front mounting ears because too much pressure will be on the front mounting eyes leaving the rear mount unstabilized in rubber or poly. If you stabilize the rear mount with one of our rear diff supports and not the front, that would put too much stress on the rear mount and run the risk of damaging the rear cover or the rear diff mount or the mounting point on the subframe. Always replace the front and rear differential mounts at the same time stabilizing both ends of the differential housing. This is the first step to a hop free IRS. |
|
| BACK TO THE TOP | |
| Q: "I see that you offer a Delrin isolated lowering rear differential mount FT 1401.
How's that different from your FT 1300 Delrin rear diff support?" |
|
| A: The FT 1300 Delrin rear diff support bushing set replaces the rubber bushing in the OEM rear diff mounting bracket. Used in conjunction with our front diff mounting bushing set FT 1200, you will be able to improve your driveline angle as it came from the factory but you will not be able to completely optimize it. In order to be able to completely optimize the driveline angle you'd need the FT 1401 Delrin isolated rear diff lowering mount. If you currently have a driveline vibe we would highly recommend the rear lowering mount. If not, you most likely don't need it unless you have increased your power level significantly. The FT 1401 Delrin isolated rear diff lowering mount is infinitely stronger than the OEM rear diff mounting bracket. The FT 1401 comes complete with the Delrin bushing installed in it. The FT 1401 is also modified to work with the Ford Racing rear diff cover we now offer. However, if you're using the FT 1401 combined with the Ford Racing diff cover you will run into some clearance issues with the inner toe link mounting brackets on the subframe. We now offer a milled Ford Racing cover FT 1350M which is specifically machined to install in the subframe without any clearance issues. |
|
| BACK TO THE TOP | |
| Q: "I have a large weight hanging off of the front nose of the differential housing on my Terminator, what is this?" | |
| A: This is an NVH weight. (Noise, Vibration, Harshness) It is placed there by FORD to absorb possible driveline vibrations generated by the mismatched driveline angles of the Terminator. This NVH weight is left off of the car when installing the FT 1200 front diff mounts because it will not fit properly and since the mismatched driveline angles have been corrected by this kit, the weight is no longer needed. |
|
| BACK TO THE TOP | |
| Q: "How bad are the driveline angles on my stock Terminator?" | |
| A: Your car came from the factory with the transmission pointing down at two degrees
and the differential housing also pointing down at two degrees as well. The driveline angle is off four degrees and that is not optimal. The driveline angles should offset each other. This means if the trans points down at two degrees, the nose of the differential should point up two degrees. With our FT 5000 kit you can improve these angles significantly. However, if you want to optimize the driveline angles completely, you will need to upgrade to our FT 5001 kit that contains our FT 1401 Delrin isolated rear diff lowering mount. |
|
| BACK TO THE TOP | |
| Q: "How much can the driveline angle be improved if I decide to use
your FT 1300 Delrin rear diff mount bushing that are included in the FT 5000 bushing kit?" |
|
| A: With the combination of the FT 1300 Delrin rear diff mount bushings and the FT 1200 front diff mount bushings you can raise the nose of the differential from pointing down at two degrees and improve it by two degrees to zero. If you also make a couple of 1/8" spacers to place between your transmission and the trans mount to raise the rear of the trans 1/4" you can also improve the forward driveline angle as well. This would improve the factory driveline angles that mismatched by four degrees to only being off by one and a half or two degrees. The FT 1401 Delrin isolated rear diff lowering mount that is included in the FT 5001 kit will allow you to completely optimize your driveline angles. |
|
| BACK TO THE TOP | |
| Q: "How much oil is required for the rear differential in an IRS?" | |
| A: The actual amount is 1.3 quarts. The Ford friction modifier is also recommended when changing the differential fluid. Park the car on a level surface, fill the differential with oil until the oil level is to the bottom of the fill hole. Do not overfill! |
|
| BACK TO THE TOP | |
| Q: "I see you now offer T2 and a T2R Torsen differentials. What is the difference between the two?" | |
| A: The T2R is a higher bias unit that supplies the tire with the most traction and the most torque. Here is the link to their website for more information. https://torsen.com/how-it-works |
|
| BACK TO THE TOP | |
| Q: "I just purchased your FT 1382 differential breather catch can, but it didn't include any installation instructions. How should I install it?" | |
| There are many options to install the diff breather catch can. The best option is to mount the catch can in the trunk. The small black hose attaches to the barbed diff cover breather fitting after the stock molded hose has been removed. The small black hose fits to the can with the adapter and a short piece of the blue hose. Be sure to route the hoses vertically with no dips in the line. The other larger diameter blue hose attaches to the can and is vented to the atmosphere. Make sure that the larger hose also runs in a vertical direction. The catch can needs to be mounted vertically anywhere in the trunk as long as it's above the diff. Check the drain plug on the bottom of the can for oil on a regular basis. |
|
| BACK TO THE TOP | |
| Q: "Its time to install the FT 1200 Front Diff Support. What is the correct orientation of the bushings and washers?" | |
 |
 |
| A: Here is a photo of the FT 1200 front diff support bushing set as it should be installed in the vehicle. For all IRS applications regardless of the rear diff mount FT 1300 or FT 1401, you want to raise the front nose of the differential up as high as you can without the differential housing actually rubbing or touching anywhere on the subframe. The small concave bushings go on top along with a mating convex washer to compensate for uneven mounting surfaces. Usually you will need a single shimming washer on the very top unless you grind the subframe slightly for some additional clearance, then you will not need the single shimming washer on top. The large concave bushings and mating convex washers along with the remaining shimming washers should be placed on the bottom. Put in as many shimming washers as you can on the bottom of each side. Some vehicles may only accept 3 or 4 shimming washers on the bottom, some will take 5 or 6. Make sure shimming washer quantities mirror each other on each left and right stack. |
|
| BACK TO THE TOP | |
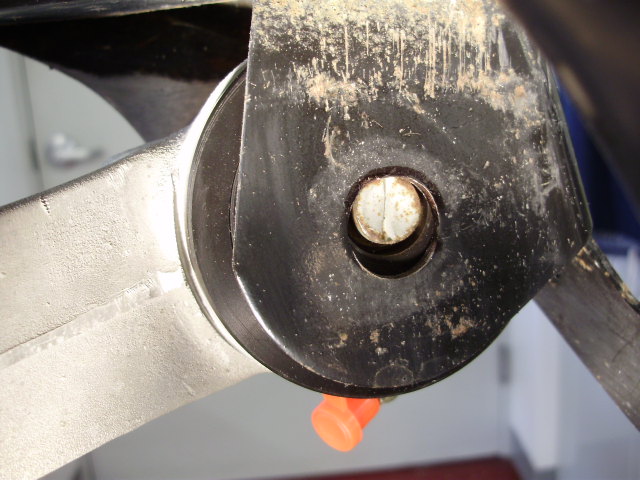
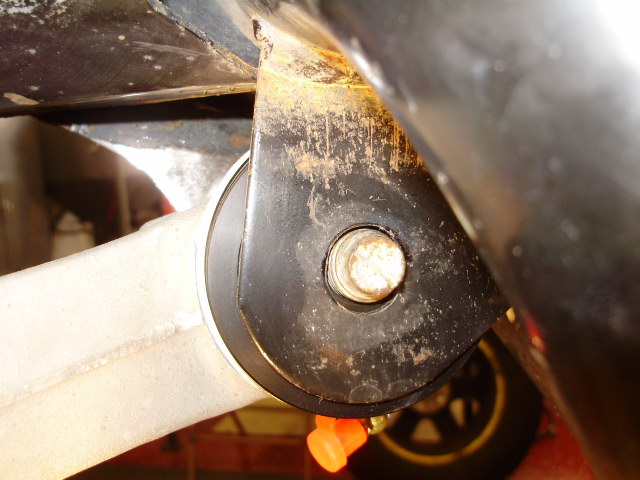
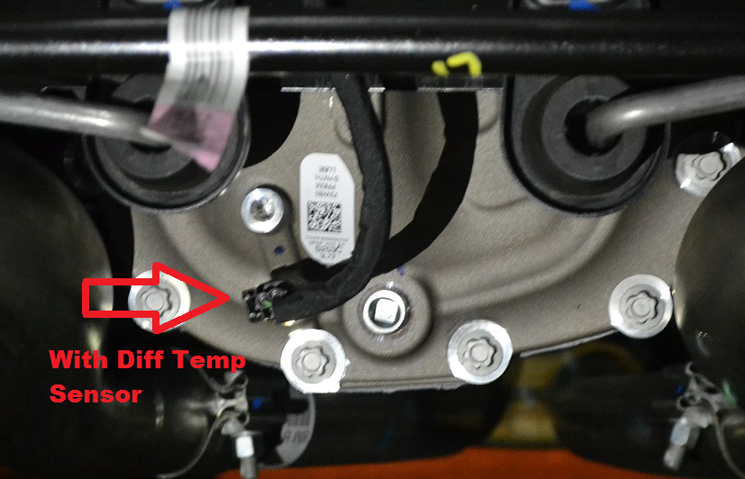
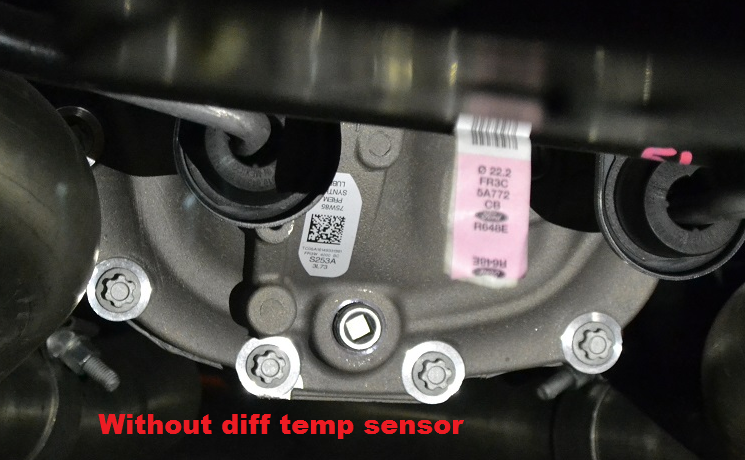
| Q: "I see on
the S550 Diff Cooler Kit (FT 570), there are two options, with or
without OEM sensor. Where would I find the sensor on the diff cover?" |
|
A: The S550 OEM sensor can be found right under the fill plug. (Click on pictures below) 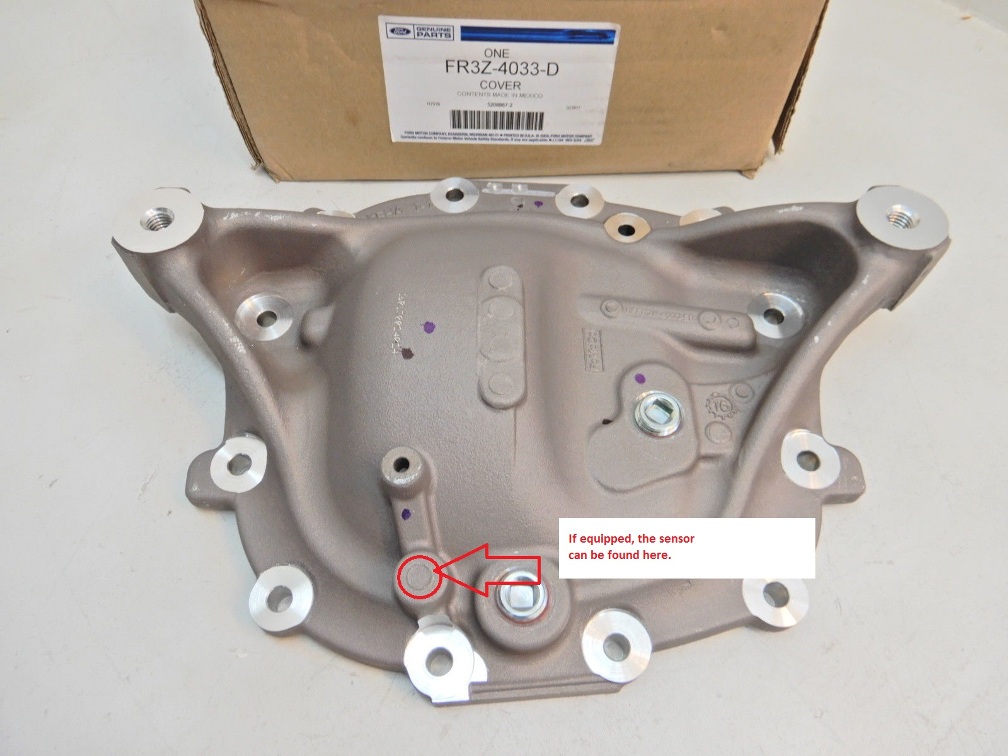 |
|
 |
 |
| BACK TO THE TOP | |
| Bumpsteer and Swaybar FAQ's | |
| Q: "What is bumpsteer?" | |
| A: Definition; Bumpsteer is when your wheels steer themselves as they travel up and down in their suspension range. The undesirable steering is caused by bumps in the road or track interacting with improper angle of your IRS toe links. When your tires move up and down in their normal suspension travel, your rear toe setting changes which scrubs speed. Most car builders design their cars to push (understeer) when taken to the limit. A push is infinitely safer than oversteer. It warns the driver much sooner and is easier to recover from. But a push is not fast, nor is it efficient. You can optimize the IRS by installing a rear bumpsteer kit and increase cornering efficiency. This is of particular importance if you've lowered your car with aftermarket lowering springs or coil-overs. |
|
| BACK TO THE TOP | |
| Q: "How important is bumpsteering the IRS?" | |
|
A: Bumpsteering the IRS after this bushing install is like putting icing on a cake. It's not critical for drag racing unless you're looking for ways to shave some extra tenths off of your ET. For guys that like to hound Corvettes in the turns you will really appreciate the optimization of a bumpsteer operation. It's a lot more critical if your car has been lowered. Adjusting bumpsteer is more for the efficiency of cornering and feeling the rear end of the car firmly planted. |
|
| BACK TO THE TOP | |
| Q: "I'm still having trouble grasping the concept of bumpsteer!" "Help me!!" | |
| A: Lately I've received LOTS of inquiries regarding questions about bumpsteer from potential customers, purchasing customers and past customers of our Aluminum, UHMW and Delrin bushing kits that I'm selling on this site. Explaining this with a keyboard is difficult at best. So I figured I'd do a video which is infinitely more informative than a few pics and notes! Click here to see the video. So hopefully this will make bumpsteer a little easier to understand. If anyone has any questions regarding bumpsteer or chassis set-up we'd be happy to explain it. |
|
| BACK TO THE TOP | |
| Q: "Are there any other benefits to bumpsteering the IRS?" | |
| A: Yes, by going with one of our new bumpsteer kits you get the very much needed upgraded toe links. These help hold your rear tires more stable. Drag racers and road racers alike need to be concerned with these components if they have upgraded the power output of their car! |
|
| BACK TO THE TOP | |
| Q: "Do I really need the bumpsteer/upgraded toe link kit and how necessary is it?" | |
| A: Well it depends. The OEM toe link is a weak spot in the IRS. So if you have upgraded the power level you need to strengthen this weak link. If your car is lowered on lowering springs or coil-overs, you will need to optimize the bumpsteer because it will have been thrown off quite a bit from lowering the suspension. So this kit is a double bonus. |
|
| BACK TO THE TOP | |
| Q: "I drag race. How important is bumpsteering the car?" | |
| A: In my opinion, bumpsteering a road race car is much more important. But having said that, bumpsteering a drag car can also be very important for someone that is concerned with tenths. When your car squats during a launch or right after every shift, the rear of the car's suspension compresses and the rear tires are in bump. Leading up to the point where you shift, the car is no longer in bump. (well, not completely) So by bumpsteering the car, you are insuring your rear tires are pointed in a forward direction no matter what position they are in. If bumpsteer is not optimized your rear tires may be pointing in a direction that is actually scrubbing speed (toeing-out or in) going down the 1,320'. This obviously is not efficient as it could be if the bumpsteer was optimized. |
|
| BACK TO THE TOP | |
|
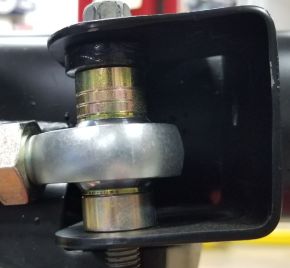
Q:
"I have an 03/04 Cobra and I purchased the FT 1860 Bumpsteer
kit. When installing, I noticed the black 1/4" spacer is missing on the top where the inner tie rod mounts to the subframe. What should I do?" |
|
 |
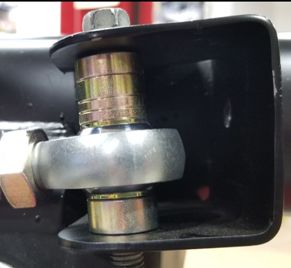 |
| A: We now offer a kit to
resolve that problem. Extended Inner Bumpsteer Upgrade Sleeve Kit Part Number - FT 1840 Kit This kit can be found here: http://www.fulltiltboogieracing.com/FT_1860.htm |
|
| BACK TO THE TOP | |
| Q: "What is the default configuration of the spacers on the FT 1860 Deluxe Bumpsteer kit?" | |
|
|
|
|
99 - 01 Cobra Bumpsteer spacer configuration. Inner Rod End. |
99 - 01 Cobra Bumpsteer spacer configuration. Outer Rod End. |
|
|
|
|
03 - 04 Cobra Bumpsteer spacer configuration. Inner Rod End. |
03 - 04 Cobra Bumpsteer spacer configuration. Outer Rod End. |
| Q: "How important are the adjustable sway bar end links?" | |
| A: The adjustable sway bar end links are necessary to properly set up and balance your suspension if you are on coil-overs. They are also a lot easier to install and remove compared to the Ford OEM parts even if you're not on coil-overs. |
|
| BACK TO THE TOP | |